|

Bench Top Joining
Video Library:
When joining up a laminated bench top, ensure that you allow yourself enough uninterrupted time. You don't need distractions when you start the process, as the glue starts setting pretty quickly. In saying that, provided you are prepared you will have no problems.
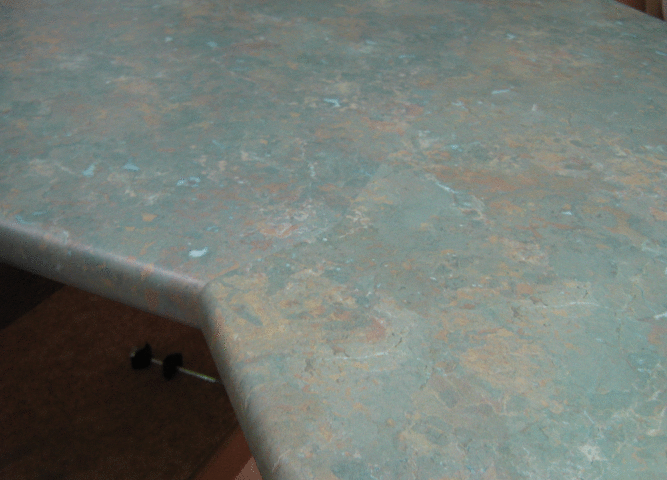
The bench top shown in this example was joined up without having to be on top of the cabinets. This is because this top is a free-standing island angled top, unlike a typical 'L' or 'U' shaped top.
Joining Process
1. Get everything you need:
- Joining Bolts + Spanner to tighten
- Hammer + Flat Block of Timber
- Clear Sanitary Grade Silicone and Applicator Gun
- PVA Wood Glue
- Cleaner (Thinners) to clean off excess Silicone + Cleaning Rags
Important: Firstly, dry-run check that the bench all fits nicely. Plane down the rear of the top if it has to go between walls - Failing to do this could cause you unwanted problems later (as the stop watch would have started and you don't need unnecessary holdups).


2. Run a bead of Silicone along the top edge, and around and down the rolled edges. Ensure there is an even amount (around 5mm down from the top of the Top). After you apply the silicone, smooth out any excess lumps and apply to any areas that didn't quite have enough. The final amount of silicone must not have any breaks in it, as it is this silicone that will be keeping any water out - so don't rush through this step.

3. Apply PVA Wood glue to either below this line or on the other bench top, but don't apply the PVA Wood glue where the silicone is going to go. After you apply the Wood glue, smooth it out so it is an even coat. It can be a little thicker as it will be squeezed into the Bench Top substrate.
Note: The Wood glue is going to hold the bench top in place once dry, whereas the silicone is just there to keep the moisture out. Don't apply just silicone only, as the top joins could easily move over time (one section raising up higher than the other) and you don't want this. There are some Tradespeople who just do this, but personally I wouldn't.
Also, don't apply just Wood glue either, as this won't keep the moisture out!

4. Begin the joining process - Insert the joining bolts and do these up so that they just grab; then do up the next one the same and so on; then go back to the first and tighten up just a tad more and do the same for the rest. As you are starting to tighten, you need to begin the height aligning process -The toggle bolts will end up aligning the two tops together, but they won't make the two tops sit nice and level (flat) with each other. This is why you don't over tighten at this stage, just a little pressure is needed. You should start to see some silicone squeezing out of the top, and that is a good sign that you have applied an adequate amount of silicone.


5. Once you have it pretty level, you start tightening each bolt a bit more, again don't over tighten and do all the bolts evenly. Then go back and repeat the tightening sequence, checking the top for level at every stage. If one part of the top is slightly higher than the other, use the hammer and a block to gently tap it down, then continue the tightening process. Don't rush this step, but also don't take too long because the glue is starting to set.


6. Once it's all reasonably tight, it should also be level. There may be just one or two small areas which are slightly rasied, so carefully check these and gently tap down any raised spots with your hammer and block.


7. Final quality check after final tightening of joining bolts.

8. Allow the Bench top to set (dry).

We hope that this information has been helpful for you.
If you need further help or more information on this topic please:
|
|